Tuesday 5 April 2011

Initial VMs configured

So with the Microserver up and running with Hyper-V, I have now started provisioning VMs.


I have got a Windows 2008 R2 VM up and running as a domain contoller, will be posting some scripts soon that I have used to create my test users & groups.


Added to this I have created another Windows 2008 R2 VM that is running Threat Management Gateway (TMG) 2010. This will serve as my firewall between the virtual environment and the internet connection. Whilst also providing proxy services for testing, and VPN access so I can access this whilst working away. Will be getting some posts up soon around TMG.


The plan is also to get a SQL server, Virtual Machine Manager (VMM), File & Print Server & more than likely App-V. All of which I am planning to blog about the installation and configuration.

Thursday 24 February 2011

Change Owner in SCVMM for multiple VMs

The more I use Powershell the more I like how it simplifies administration. Whether you using it with Windows Operating Systems, Exchange, Hyper-V, SCVMM, VMware or the many other uses it can make life much easier.

One of the ways I have used Powershell recently was to update the Owner property of multiple virtual machines in System Center Virtual Machine Manager (SCVMM). What I really liked was just how short the piece of code was to achieve this.

Change Owner for all VMs

$vms = get-vm *
foreach ($vm in $vms)
{
set-vm $vm -Owner *Domain*\*User or Group*
}

Note: Substitute *Domain* for the AD Domain & *User or Group* for the Username or Group.


That is infinitley quicker than right clicking each VM and then changing the owner!!!

So once I saw how easy this was I started to add to it.

In larger Hyper-V & SCVMM implementations it is likely that one the scenarios below may be useful too:

Change Owner for VMs in a predefined list using an array:

$vms = @("vm1","vm2","vm3","vm4","vm5")
foreach ($vm in $vms)
{
set-vm $vm -Owner *Domain*\*User or Group*
}

Note: Substitute *Domain* for the AD Domain and *User or Group* for the Username or Group.


Change Owner for VMs with specific naming standard:

$vms = get-vm *sql*
foreach ($vm in $vms)
{
set-vm $vm -Owner *Domain*\*User or Group*
}

Note: Substitute *Domain* for the AD Domain and *User or Group* for the Username or Group.

Obviously this is only using the -Owner attribute of set-vm. When you look at just how many different options you have with set-vm, there are numerous possibilities of how to make changes to a larger number of VMs in one hit.

This is a very simple start to hopefully what will become a series of blog posts from me on Powershell scripts.

Below are the list of available options for set-vm, so these can all be used in the ways shown above to alter multiple VMs...

NAME
Set-VM

SYNOPSIS
Changes properties of a virtual machine managed by Virtual Machine Manager.

SYNTAX
Set-VM [-VM] [] -JobGroup [-BootOrder ]
[-CostCenter ] [-CPUCount ] [-CPUMax ]
[-CPUReserve ] [-CPUType ] [-Custom1 ]
[-Custom10 ] [-Custom2 ] [-Custom3 ] [-Custom4 ]
[-Custom5 ] [-Custom6 ] [-Custom7 ] [-Custom8 ]
[-Custom9 ] [-DelayStart ] [-Description ]
[-DiskIO ] [-EnableBackup ] [-Enabled ]
[-EnableDataExchange ] [-EnableHeartbeat ]
[-EnableOperatingSystemShutdown ]
[-EnableTimeSynchronization ]
[-ExcludeFromPRO ] [-ExpectedCPUUtilization ]
[-HighlyAvailable ] [-InstallVirtualizationGuestServices]
[-JobVariable ] [-LimitCPUForMigration ]
[-LimitCPUFunctionality ] [-MemoryMB ] [-Name ]
[-NetworkUtilization ] [-NumLock] [-OperatingSystem ]
[-Owner ] [-PROTipID ] [-QuotaPoint ]
[-RelativeWeight ] [-RemoveSelfServiceUserRole ] [-RunAsSystem]
[-RunAsUserCredential ] [-RunAsynchronously ]
[-StartAction ] [-StopAction ] [-Tag ]
[-UseHardwareAssistedVirtualization ] [-UserRole ]
[-VMwareResourcePool ] []

DESCRIPTION
Changes one or more properties of a virtual machine managed by Virtual Machine
Manager. Properties that you can change include:
* Name, owner, and description of a VM.
* BIOS boot order (for VMs on a Hyper-V host)
* Amount of resources on the host used by a VM. These include:
- Maximum amount of host CPU resources that a VM can use.
- Minimum amount of host CPU resources that a VM can use.
- Expected use of host CPU by a VM.
- Amount of host CPU resources used by one VM relative to
other VMs on the same host.
- Amount of host memory that a VM can use.
- Amount of bandwidth on the host's network that a VM can use.
* Hardware settings for a VM unrelated to host resources. These include:
- Number of CPUs
- Type of CPU
- Number of disk input/output operations per second (IOPS)
- Limiting CPU functionality (for an older operating system,
such as Windows NT 4.0)
* Cost center, tag, and custom settings used to filter VMs by criteria
that you set.
* Settings that enable various optional capabilities, including:
- Enabling or disabling a library object to make it available,
or temporarily unavailable, to users
- Enabling backing up a VM on a Hyper-V host with Volume Shadow Copy
- Enabling a key/value pair for data exchange between a VM and its
Hyper-V host
- Enabling a signal to monitor a VM on a Hyper-V host.
- Enabling shutdown of a VM from teh Hyper-V console.
- Enabling time synchronization between a VM and its Hyper-V host.
- Enabling the BIOS value for NumLock for a VM on a Windows host.
* Setting that identifies whether a VM is highly available, that is,
a VM to be deployed on a node of a Hyper-V host cluster.
* Setting that determines whether virtualization guest services are
installed on a Windows-based VM.
* Number of seconds to delay before starting a VM.
* Setting that identifies the operating system used for a VM.
* Settings that specify whether to run a VM on a Virtual Server host under
the local system account or under a guest account (domain\account).
* Start and stop actions for a VM.
* Setting that determines whether a VM on a Virtual Server host uses
hardware-assisted virtualization.
* Setting that limits the number of VMs self-service users can create.
* Setting used to switch the role that a self-service user who belongs
to multiple roles uses to manage a VM.
* Setting that assigns a VM on an ESX host to a VMware resource pool.

If you want to change the properties of a virtual floppy drive, virtual DVD
drive, virtual network adapter, or virtual SCSI adapter associated with a
specific virtual machine, you can use Set-VirtualFloppyDrive,
Set-VirtualDVDDrive, Set-VirtualNetworkAdapter, or Set-VirtualSCSIAdapter,
respectively.

For more information about virtual machines, type:
Get-Help New-VM -detailed

RELATED LINKS

DisableUndoDisk-VM
DiscardSavedState-VM
Move-VM
New-VM
Refresh-VM
Remove-VM
Repair-VM
Resume-VM
SaveState-VM
Shutdown-VM
Start-VM
Stop-VM
Store-VM
Suspend-VM

REMARKS
To see the examples, type: "get-help Set-VM -examples".
For more information, type: "get-help Set-VM -detailed".
For technical information, type: "get-help Set-VM -full".

Re-motivated...

It has been a very long time, too long in fact, since I have made the time to do some blogging...


I have decided that this is very lax of me and this must change...


To that end I have taken steps to get a decent test environment up and running so that I can try out the growing portfolio of virtualisation products and tools. With VMware, Microsoft and Citrix now all providing numerous virtualisation products, from Type 1 and Type 2 hypervisors, VDI solutions and application virtualisation there is plenty to keep me interested. I have decided to start the new posts with the Microsoft Virtualisation product line.


The test server I decided to use is a HP Microserver, this fit my goals:


  • Reasonable specs to run enough virtual machines (Dual Core AMD processor & maxed out to 8GB of RAM)

  • Internal Storage - the plan is to get shared storage later on, but for now local storage met my cost requirements

  • Talking of cost requirements, I wanted the server to not impact my bank balance too much

I have been very impressed with the server so far. It is very quiet, Microsoft Windows 2008 R2 installed with no issues at all and I have VMs up and running in a very short time frame.

So now I have my environment up and running more posts will follow :)


Wednesday 28 January 2009

Windows Server 2008 resources

With Windows Server 2008 a number of new features or changes to OS have been made, lots of which are going to be of great use to Administrators and users alike. Of course this is where Hyper-V gets a mention. I have not yet had a chance to install Hyper-V but it is on my list of things to do, so expect a post on that soon.

With the current global financial climate I personally think that all the virtualisation technologies are going to get more attention from small businesses right up to the large corporations. Also now that the options for virtualisation have grown, now you get to pick VMware ESX, Citrix XenServer, Microsoft Hyper-V to name three, the competition between the big players will only benefit us all as customers. Along with server consolidation desktop and application virtualisation are gathering momentum.

One of the areas that has seen some of the improvements is clustering. The links below are all for Clustering:

Windows 2008 Failover Clustering Homepage:
http://www.microsoft.com/Windowsserver2008/en/us/clustering-home.aspx

Windows 2008 Failover Clustering Technet Lab Registration:
http://msevents.microsoft.com/CUI/WebCastEventDetails.aspx?EventID=1032345932&EventCategory=3&culture=en-US&CountryCode=US

I have personally completed this lab, and found it very useful. There are numerous labs available from Technet, the link below is the list:

http://msevents.microsoft.com/CUI/SearchDisplay.aspx?culture=en-US&evtTypHero=4#eventType=4;culture=en-US;searchcontrol=yes;advanced=mnp;pageNumber=1;sortKey=;sortOrder=;pageEvent=false

Below is a link to a number of Windows 2008 server Step-bySteps:
http://www.microsoft.com/downloads/details.aspx?FamilyID=518d870c-fa3e-4f6a-97f5-acaf31de6dce&displaylang=en

Another feature that I really like is the File Screening, the ability to block certain file types from being saved to a file server could be very useful in a tightly controlled environment. See the link below:
http://technet.microsoft.com/en-us/library/cc754810.aspx

I will be continuing to explore Windows Server 2008 and it's new features, so will post more as I come across it. Also going to start looking at the Windows 7 Beta (http://www.microsoft.com/windows/windows-7/beta-download.aspx)

Wednesday 26 November 2008

New Posts coming soon...

Well after a good few weeks of problems with my home machine (hard disk failure and then fried graphics card once the hard disk was replaced). I now have my machine back up and running, but more importantly I have access to my VM's again... so expect new posts very soon... home pc allowing of course :)

Wednesday 24 September 2008

App-V Virtualization Management Server installation

I have now got my Microsoft System Center Application Virtualization Management Server, the steps I took are listed below:

  • AD Groups - I treated this installation as though I was doing it in a production environment. So before I started building any new servers or doing anything else I created two groups in AD, App-V-Admins and App-V-Users. You could use Domain Admins and Domain Users but I personally prefer to have specific groups, you can always nest the Domain Admins or Domain Users groups in.

  • SQL Server - I have a SQL 2005 server that also serves as my Citrix License server, so I wanted to use this rather than have a local SQL Express install on the management server. I created a new database called App-V and made sure the account I was using to do the installation had full rights to the App-V DB.


  • Server Build - I then built a VM (well cloned my sysprep'ed template). Installed IIS and ASP.NET. Installed .NET Framework 3.0. Applied all the latest Microsoft patches.

  • MDAC 2.8 - I also installed MDAC 2.8, although this is not listed in the pre-reqs I was having some issues getting the Application Virtualization Management Service to connect to the database, so I reviewed the pre-reqs for earlier versions of SoftGrid and MDAC was listed specifically for this service. So I installed the latest version and now it works fine.

Note: I am going to do a reinstallation on a blank server to check if MDAC is really a requirement, I will update the post once I have done this.

  • Installed Microsoft System Center Application Virtualization Management Server:
I will now add some screenshots of the screens worth mentioning...

The first screen is the pretty much standard welcome screen that most if not all installers have now. The next screen is the standard License agreement, tick the box to accept and move on. I found the next screen a nice touch, you can select Microsoft Update as the source of updates for App-V, I really like this idea as this is a good way to ensure you are aware of App-V updates.

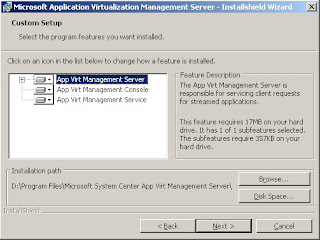
After the Microsoft Update screen came the standard Name and Organization screen. I then got the choice of typical or custom installation, so I of course took custom. The next screen is the components that will be installed and where they will be installed to. I moved them from the default of C: to my D: drive. There are three components to the App-V Management Server:

App-V Management Server, App-V Management Console & App-V Management Service
The next screen in the installation is the database selection screen. I selected the server with SQL 2005 and clicked next. The installer then connects to the SQL server and you get to pick the existing database to use or specify a new database name for it to create.

The next screen was regarding setting up Secure Communication mode, this had all the options grayed out so was a simple click next.

Then you get information about the Port Settings for RTSP, I left this with the default port of 554.

The next two screens are self explanatory, App-V Administrators and App-V Users, so specify the relevant group and click next.

Now you get prompted about the Content directory location, this is one of the most important screens in the installation. This is where the Content share is going to be located. The Content share is where you will need to install all your sequenced applications. This can easily be put on an existing network share, file server or NAS. For the small environment I have I left it in the default location.
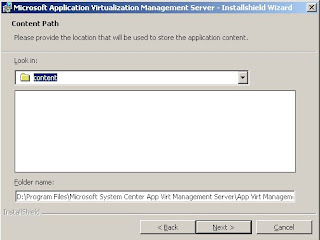
Once you click next on the Content directory screen you get the install button...

After the installation completes you get prompted to reboot. I rebooted the VM and then once it was back up I logged in, went to Administrative tools and started the App-V Management Console. At first it looks like there is nothing to see, you need to connect to the App-V server. To do this right click on the Application Virtualization Systems icon in the left hand pane of the MMC and select Connect to Application Virtualization System.
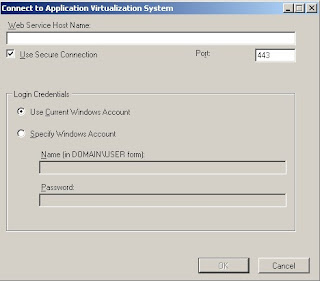

I unchecked secure connection, the port changed from 443 to 80 as expected and then I specified localhost.
My App-V server is now up and running and I can now move onto getting a Sequencer built so I can sequence my first application and get going with some streaming to a terminal server.

Monday 15 September 2008

SoftGrid 4.5 AKA App-V

Having been lucky enough to receive the training for SoftGrid 4.2 from the Softricity guys pre-Microsoft purchase, I have long been a fan of SoftGrid. So when I saw the Technet blog entry (http://blogs.technet.com/softgrid/archive/2008/09/03/microsoft-application-virtualization-4-5-rtms.aspx) for the new version of SoftGrid 4.5 or App-V as it is now known, I looked forward to being able to have the time to install it.

After registering on the Microsoft Connect Web Site (https://connect.microsoft.com/) I downloaded the App-V installation files ready to install into my home lab.

In order to get the environment ready I checked through the documentation for the Trial System Requirements (http://www.microsoft.com/downloads/details.aspx?FamilyID=aa787491-8d08-4d2f-8960-9e9f00226c7e&DisplayLang=en). As in the previous version of SoftGrid the following components are required:

Server Components:

Active Directory – DNS & Group Policies specifically

Microsoft Application Virtualization Sequencer – The Sequencer is the brains of SoftGrid. This will “record” changes to the system when installing a new application, this creates the SoftGrid package for the application.

Microsoft System Center Application Virtualization Server – If the Sequencer is the brains of SoftGrid, this server is the heart. This is the server where the packages are imported and permissions are set.

Content Share – This share is where all the packages create in the Sequencer are stored and then where they are imported into the Application Virtualization Server. This share needs to be accessible to all clients too.

Clients:

Microsoft Application Virtualization for Terminal Services – The client to allow streaming to Terminal Servers

Microsoft Application Virtualization for Desktops – The client to allow streaming to desktop clients.

So to get App-V up and running I will be creating one new Windows 2003 virtual machine for the Microsoft System Center Application Virtualization Server, this will have a local installation of SQL Express 2005 for the database, a Content share and the Application Virtualization Server console.

I will then create a second Windows 2003 virtual machine for the Sequencer, this will have just the base OS and Sequencer software installed on the C: drive. I will then add a second disk, setup as the Q: drive in the OS, an independent persistent disk. I did consider using a non-persistent disk, as in an ideal world the Sequencer will process any installation reboots for applications without having to reboot the actual VM. Having seen applications where sometimes the actual reboot is needed by the package I am going use snapshots instead. I will take a snapshot of the base VM and then revert to that once an application is sequenced.

I already have AD and a Terminal Server so will just install the client on the Terminal Server.

Once I have the environment up and running I will do another post with details of what I have sequenced and how I am finding the new version.