- AD Groups - I treated this installation as though I was doing it in a production environment. So before I started building any new servers or doing anything else I created two groups in AD, App-V-Admins and App-V-Users. You could use Domain Admins and Domain Users but I personally prefer to have specific groups, you can always nest the Domain Admins or Domain Users groups in.
- SQL Server - I have a SQL 2005 server that also serves as my Citrix License server, so I wanted to use this rather than have a local SQL Express install on the management server. I created a new database called App-V and made sure the account I was using to do the installation had full rights to the App-V DB.
- Server Build - I then built a VM (well cloned my sysprep'ed template). Installed IIS and ASP.NET. Installed .NET Framework 3.0. Applied all the latest Microsoft patches.
- MDAC 2.8 - I also installed MDAC 2.8, although this is not listed in the pre-reqs I was having some issues getting the Application Virtualization Management Service to connect to the database, so I reviewed the pre-reqs for earlier versions of SoftGrid and MDAC was listed specifically for this service. So I installed the latest version and now it works fine.
Note: I am going to do a reinstallation on a blank server to check if MDAC is really a requirement, I will update the post once I have done this.
- Installed Microsoft System Center Application Virtualization Management Server:
The first screen is the pretty much standard welcome screen that most if not all installers have now. The next screen is the standard License agreement, tick the box to accept and move on. I found the next screen a nice touch, you can select Microsoft Update as the source of updates for App-V, I really like this idea as this is a good way to ensure you are aware of App-V updates.

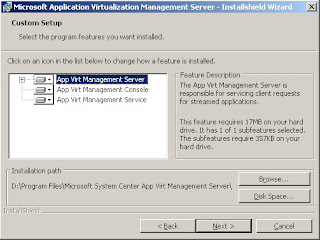
App-V Management Server, App-V Management Console & App-V Management Service
The next screen in the installation is the database selection screen. I selected the server with SQL 2005 and clicked next. The installer then connects to the SQL server and you get to pick the existing database to use or specify a new database name for it to create.
The next screen was regarding setting up Secure Communication mode, this had all the options grayed out so was a simple click next.
Then you get information about the Port Settings for RTSP, I left this with the default port of 554.
The next two screens are self explanatory, App-V Administrators and App-V Users, so specify the relevant group and click next.
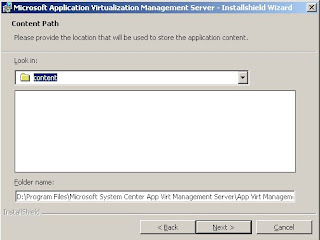
Now you get prompted about the Content directory location, this is one of the most important screens in the installation. This is where the Content share is going to be located. The Content share is where you will need to install all your sequenced applications. This can easily be put on an existing network share, file server or NAS. For the small environment I have I left it in the default location.
 Once you click next on the Content directory screen you get the install button...
After the installation completes you get prompted to reboot. I rebooted the VM and then once it was back up I logged in, went to Administrative tools and started the App-V Management Console. At first it looks like there is nothing to see, you need to connect to the App-V server. To do this right click on the Application Virtualization Systems icon in the left hand pane of the MMC and select Connect to Application Virtualization System.
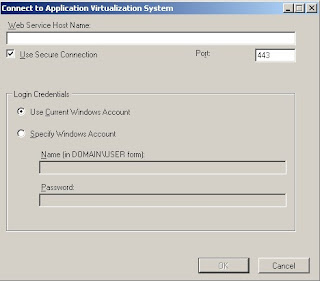
I unchecked secure connection, the port changed from 443 to 80 as expected and then I specified localhost.
My App-V server is now up and running and I can now move onto getting a Sequencer built so I can sequence my first application and get going with some streaming to a terminal server.
1 comment:
Hey Mark,
Awesome post and run-through i will keep an eye on your site, this is great stuff. I personally have not had the time to look into the Microsoft virtualization products as much as i would have loved to, so it is great to be able to come here for an update :-) Will have to get into the MS side of things soon :-)
Rene Vester
Post a Comment