Wednesday, 24 September 2008

App-V Virtualization Management Server installation

I have now got my Microsoft System Center Application Virtualization Management Server, the steps I took are listed below:

  • AD Groups - I treated this installation as though I was doing it in a production environment. So before I started building any new servers or doing anything else I created two groups in AD, App-V-Admins and App-V-Users. You could use Domain Admins and Domain Users but I personally prefer to have specific groups, you can always nest the Domain Admins or Domain Users groups in.

  • SQL Server - I have a SQL 2005 server that also serves as my Citrix License server, so I wanted to use this rather than have a local SQL Express install on the management server. I created a new database called App-V and made sure the account I was using to do the installation had full rights to the App-V DB.


  • Server Build - I then built a VM (well cloned my sysprep'ed template). Installed IIS and ASP.NET. Installed .NET Framework 3.0. Applied all the latest Microsoft patches.

  • MDAC 2.8 - I also installed MDAC 2.8, although this is not listed in the pre-reqs I was having some issues getting the Application Virtualization Management Service to connect to the database, so I reviewed the pre-reqs for earlier versions of SoftGrid and MDAC was listed specifically for this service. So I installed the latest version and now it works fine.

Note: I am going to do a reinstallation on a blank server to check if MDAC is really a requirement, I will update the post once I have done this.

  • Installed Microsoft System Center Application Virtualization Management Server:
I will now add some screenshots of the screens worth mentioning...

The first screen is the pretty much standard welcome screen that most if not all installers have now. The next screen is the standard License agreement, tick the box to accept and move on. I found the next screen a nice touch, you can select Microsoft Update as the source of updates for App-V, I really like this idea as this is a good way to ensure you are aware of App-V updates.

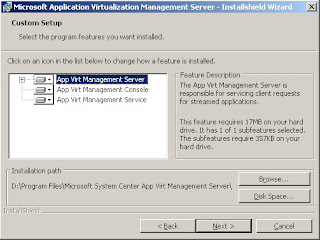
After the Microsoft Update screen came the standard Name and Organization screen. I then got the choice of typical or custom installation, so I of course took custom. The next screen is the components that will be installed and where they will be installed to. I moved them from the default of C: to my D: drive. There are three components to the App-V Management Server:

App-V Management Server, App-V Management Console & App-V Management Service
The next screen in the installation is the database selection screen. I selected the server with SQL 2005 and clicked next. The installer then connects to the SQL server and you get to pick the existing database to use or specify a new database name for it to create.

The next screen was regarding setting up Secure Communication mode, this had all the options grayed out so was a simple click next.

Then you get information about the Port Settings for RTSP, I left this with the default port of 554.

The next two screens are self explanatory, App-V Administrators and App-V Users, so specify the relevant group and click next.

Now you get prompted about the Content directory location, this is one of the most important screens in the installation. This is where the Content share is going to be located. The Content share is where you will need to install all your sequenced applications. This can easily be put on an existing network share, file server or NAS. For the small environment I have I left it in the default location.
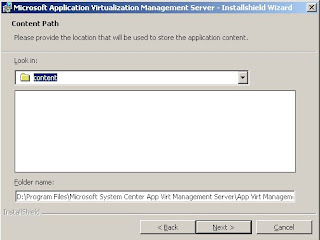
Once you click next on the Content directory screen you get the install button...

After the installation completes you get prompted to reboot. I rebooted the VM and then once it was back up I logged in, went to Administrative tools and started the App-V Management Console. At first it looks like there is nothing to see, you need to connect to the App-V server. To do this right click on the Application Virtualization Systems icon in the left hand pane of the MMC and select Connect to Application Virtualization System.
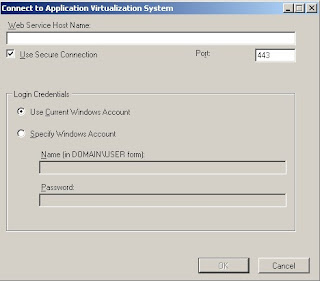

I unchecked secure connection, the port changed from 443 to 80 as expected and then I specified localhost.
My App-V server is now up and running and I can now move onto getting a Sequencer built so I can sequence my first application and get going with some streaming to a terminal server.

Monday, 15 September 2008

SoftGrid 4.5 AKA App-V

Having been lucky enough to receive the training for SoftGrid 4.2 from the Softricity guys pre-Microsoft purchase, I have long been a fan of SoftGrid. So when I saw the Technet blog entry (http://blogs.technet.com/softgrid/archive/2008/09/03/microsoft-application-virtualization-4-5-rtms.aspx) for the new version of SoftGrid 4.5 or App-V as it is now known, I looked forward to being able to have the time to install it.

After registering on the Microsoft Connect Web Site (https://connect.microsoft.com/) I downloaded the App-V installation files ready to install into my home lab.

In order to get the environment ready I checked through the documentation for the Trial System Requirements (http://www.microsoft.com/downloads/details.aspx?FamilyID=aa787491-8d08-4d2f-8960-9e9f00226c7e&DisplayLang=en). As in the previous version of SoftGrid the following components are required:

Server Components:

Active Directory – DNS & Group Policies specifically

Microsoft Application Virtualization Sequencer – The Sequencer is the brains of SoftGrid. This will “record” changes to the system when installing a new application, this creates the SoftGrid package for the application.

Microsoft System Center Application Virtualization Server – If the Sequencer is the brains of SoftGrid, this server is the heart. This is the server where the packages are imported and permissions are set.

Content Share – This share is where all the packages create in the Sequencer are stored and then where they are imported into the Application Virtualization Server. This share needs to be accessible to all clients too.

Clients:

Microsoft Application Virtualization for Terminal Services – The client to allow streaming to Terminal Servers

Microsoft Application Virtualization for Desktops – The client to allow streaming to desktop clients.

So to get App-V up and running I will be creating one new Windows 2003 virtual machine for the Microsoft System Center Application Virtualization Server, this will have a local installation of SQL Express 2005 for the database, a Content share and the Application Virtualization Server console.

I will then create a second Windows 2003 virtual machine for the Sequencer, this will have just the base OS and Sequencer software installed on the C: drive. I will then add a second disk, setup as the Q: drive in the OS, an independent persistent disk. I did consider using a non-persistent disk, as in an ideal world the Sequencer will process any installation reboots for applications without having to reboot the actual VM. Having seen applications where sometimes the actual reboot is needed by the package I am going use snapshots instead. I will take a snapshot of the base VM and then revert to that once an application is sequenced.

I already have AD and a Terminal Server so will just install the client on the Terminal Server.

Once I have the environment up and running I will do another post with details of what I have sequenced and how I am finding the new version.

Monday, 8 September 2008

Windows 2003 Release 2 – slipstreaming Service Pack 2

For anyone who has to build Windows servers on a regular basis integration of Service Packs has been pretty much a must have skill for a while now. The reason I say this is we have all been in the situation where a new server is needed now, now meaning 2 days ago… meaning that time is premium and having to apply Service Packs after the build once the server is up and running can slow you down.

Windows 2003 Release 2 offered a slightly newer challenge compared to older versions of Windows, being that it had 2 CD’s. After some googling around I found that the /integrate option of the Service Pack would actually work with both disks. So I extracted both CDs to folders on my computer and ran the integrate command:

WindowsServer2003-KB914961-SP2-x86-ENU.exe /integrate:C:\Temp\W2K3_R2_CD1
WindowsServer2003-KB914961-SP2-x86-ENU.exe /integrate:C:\Temp\W2K3_R2_CD2


This worked without any problem. So I got to thinking, that the second CD is not actually that big, so why not include that with CD1. So I went through the extraction process and put the contents of both CD’s into one folder on my PC. The size of this folder was 763MB, so this would indeed fit on a 800MB CD as well as being a good ISO. You can then integrate the Service Pack with this combined directory either using the command line method of *service pack name*.exe /integrate:*file path* or you could use this handy utility I found called nLite (http://www.nliteos.com/).

nLite is a very useful utility as this allows you not only to slipstream in Service Packs, but also standard Windows Updates, Drivers, add/remove components, unattended options, general options, tweaks (Registry and Services) and it can create a bootable ISO. So if you have to press F6 during the build to install the disk array drivers, nLite can save you this pain. nLite works with Windows 2000, XP and 2003.

I am now using a single disk/ISO Windows 2003 Release 2 (with SP2 and most common array drivers) for both physical builds and VM’s.

Friday, 5 September 2008

VMware ColdClone – Unable to determine Guest OS

So for anyone that has migrated a physical server to a virtual server (P2V’ed), you may well have come across the “Unable to determine Guest OS” message when using the ColdClone CD. For those of you who have not yet migrated a physical server to an ESX Environment I will quickly run through the main two ways you will see…

HotClone – This refers to using the VMware Converter plugin from within VirtualCenter itself. This process is done with the target server up and running, so really should only be used on servers with static data, as during the migration users, other admins, etc will still have access to the server. The pre-requisites are licensing for Converter and the plugin installed and enabled in VirtualCenter.

To initiate a HotClone of a physical server you select the cluster or host ESX server you wish to migrate the server to, now right click and select Import Machine… The wizard will then start and guide you through the process of importing the machine. I am not going to go into detail about the HotClone process as I am going to move onto the ColdClone process as this is where you will see the error I mentioned.

ColdClone – Considered the safest form of migrating a physical server to a VM. This is mainly due to the fact that the server is effectively down during the migration process. The ColdClone process uses a bootable ISO image, to bring the server up in WinPE that runs VMware Converter. So as with a standard installation of Windows, the drivers included in the base build may not be relevant to the hardware you are using.

So the “Unable to determine Guest OS” is, from my experience, normally due to WinPE not being able to access the harddisks. In most cases this will be due to the Array driver not being part of WinPE.

Included with the ColdClone.iso (which is available to download from http://www.vmware.com/, providing you have the Enterprise license for Converter) is the PETOOL.EXE. This can add drivers to WinPE, however I have had mixed results using this so I have also got a manual way of doing it, which I will now detail.

Step 1 - Download the required drivers
Depending on your hardware vendor download their drivers for the Array Controller, you will need the driver that would be used during the text phase of a Windows server, the same driver that you would use the F6 option during the Windows installation process.

Step 2 – Extract the driver files
Once the download has completed extract the drivers to a folder on your computer.

Step 3 – Extract the ColdClone.iso
Extract the contents of the ColdClone.iso to a local folder on your computer.

Step 4 – Create the driver folder
Browse to \i386\System32\Drivers in the extracted ISO. Create a folder for your driver, e.g. PERC.

Step 5 – Add the drivers
Now copy the drivers to the folder you just created.

Step 6 – Edit winpeoem.sif
Browse to \i386\System32 and edit winpeoem.sif in a text editor, e.g. Notepad. Now find the following lines in the file:

[OemDriverParams]
OemDriverRoot= "drivers"
OemDriverDirs= vmscsi, Adaptec, Emulex, QLogic

These lines represent the drivers that will be loaded, so now you need to add the folder that contains your drivers. See example below:

[OemDriverParams]
OemDriverRoot= "drivers"
OemDriverDirs= vmscsi, Adaptec, Emulex, QLogic, PERC

Save the file.

Step 7 – Create a bootable ISO
Now create a bootable ISO (and/or CD) using the modified ColdClone files.

You should now be able to test this by booting a server up using the CD/ISO and checking that it can now see the hard disks. This process can be repeated to add multiple drivers, giving you one ColdClone CD/ISO that will work with all your servers.

Thursday, 4 September 2008

VMware ESX 3.5 & VirtualCenter 2.5 with Update 2

So for my first post I thought I would mention something I have found while working with ESX 3.5 and VirtualCenter 2.5. Recently I was at a customers site doing a VMware ESX installation. We had three ESX 3.5 Update 1 servers up and running all being managed by a VirtualCenter server running 2.5 Update 1.

So when demoing Update Manager we set one of the ESX servers to apply the critical updates by applying the baseline and then setting remediate to run 5 minutes in the future. So the customer looks on happily at how the ESX server puts itself into Maintenance Mode and migrates VM's off in preparation for patching and the subsequent reboot. The ESX host comes back up and all is well. That is until we rebooted the VirtualCenter server, this is when the VirtualCenter service decides that it will no longer start... the following error is in Event Viewer...

Event ID 7024 - The VMware VirtualCenter Server service terminated with service-specific error 2 (0x2)

So with some google'ing about I find the following thread on the VMware forums, http://communities.vmware.com/thread/122543;jsessionid=7A5139DFE94BA6A4AD870E08F442DF23?tstart=0&start=15

Although this post lists this situation now, it didn't at the time, and admittedly I did add this scenario to that post... The post was mentioning IIS and Converter Services being the issue, I had no IIS and and even when disabling Converter I had the same issue...

So after stepping back to think about what had changed recently, I realised that one of the three ESX servers was a higher build version than VirtualCenter. So I installed VirtualCenter 2.5 Update 2 to the VC server and rebooted... the VC server came back up, all services started without any complaints and we were running again.

Historically speaking, when working with ESX environments pre-Update Manager, VirtualCenter was always updated first, thanks to Jason Willey (http://www.virtuallycrazy.blogspot.com). As it makes complete sense that the management server is backwards compatible with older versions of ESX, but cannot know about new features or changes.

I am a fan of Update Manager for ESX, my main reason for posting this is to get the point across that it will make your lives easier as long as you remember to keep VirtualCenter updated too, and more importantly updated before the ESX servers.